Internal Dashboard Introduction Last updated: January 01 2023 12:17.

The home of storjDashboard documentation.

For this project we use NGINX+PHP+MySQL.

  • OS: Ubuntu 20.04+, Debian 10+, Windows 10+
  • Software: NGINX + PHP + MySQL
  • PHP Minimum version 8.0>

Installation

These instructions provide some already guided tutorials by well known contributors along with some amendments required for StorjDashboard Internal.

Ubuntu/Debian

Almost identical installation to a windows device although this focus more on CLI for linux machines.

Steps:
  • Step 1 : Install NGINX/PHP/MySQL
  • Step 2 : Download latest version
  • Step 3 : Upload to FTP or transfer files to your public(www) folder.
      • This will work inside any folder.
      • Edit /cfg.php - needs to be edited to reflect the true root pathway.
        $root_dir = "/var/www/html/.[FOLDER].";
      • Edit /Connections/sql.php - needs to have the correct server ip, username and password including database.
      • Load your path in a browser (example: http://192.168.0.100/folder)
        You should automatically be redirected to the 'install' folder where it will run some testing.
        • You might see some fails on this page. This is normal for the start of the setup. You may see a link directing you to 'Create DB'. If you do, follow this link to continue creating your database.
  • Step 4 : Run configuration file.
      • example: http://192.168.0.100/folder/install
        also if you load your folder directory you should be taken to the install directory if the install folder exists.
      • if your database is not configured you can use the wizard page to complete this.
        example: http://192.168.0.100/folder/install/db_setup.php
        This will also create your admin login account.

Windows

Almost identical installation to a windows device although this focus more on CLI for linux machines.

Steps:
  • Step 1 : Install APACHE/PHP/MySQL
  • Step 2 : Download latest version
  • Step 3 : Upload to FTP or transfer files to your public(www) folder.
      • This will work inside any folder.
      • /cfg.php file needs to be edited to reflect the true root pathway.
        $root_dir = "c:\httpdocs\website1\.[FOLDER].";
      • Edit /Connections/sql.php - needs to have the correct server ip, username and password including database.
      • Load your path in a browser (example: http://192.168.0.100/folder)
        You should automatically be redirected to the 'install' folder where it will run some testing.
        • You might see some fails on this page. This is normal for the start of the setup. You may see a link directing you to 'Create DB'. If you do, follow this link to continue creating your database.
  • Step 4 : Run configuration file.
      • example: http://192.168.0.100/folder/install
        also if you load your folder directory you should be taken to the install directory if the install folder exists.
      • if your database is not configured you can use the wizard page to complete this.
        example: http://192.168.0.100/folder/install/db_setup.php
        This will also create your admin login account.

Features

These instructions provide some already guided tutorials by well known contributors along with some amendments required for StorjDashboard Internal.

Node Management

Almost identical installation to a windows device although this focus more on CLI for linux machines.

  • Add Node

    • Nodes > Add

    • Add node details.
  • Edit Node

    • Click the edit icon on the dashboard screen

    • Edit the details and then click 'Update'
      ** Note: 'Delete Node' appears within the edit screen.
  • Delete Node

    • A confirmation box will appear upon clicking this Delete Node button.

Docker management

Almost identical installation to a windows device although this focus more on CLI for linux machines.

Configuration is required to amend the standard docker initial start instruction.
  • Ubuntu
    • SSH into your machine
    • sudo nano /lib/systemd/system/docker.service

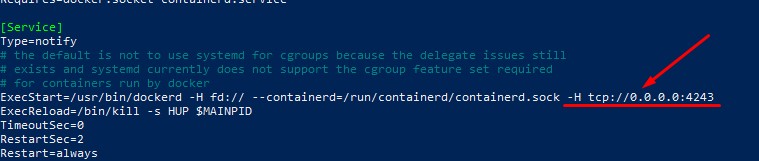
    • -H tcp://0.0.0.0:4243  added to the end of the ExecStart command.
      You can change -H tcp://0.0.0.0:4243  to  -H tcp://127.0.0.1:4243  if this works better for you.
      Providing you do not open your port   4243   to the world on your router your docker will remain safe.
    • If you have your storagenode running (check by doing DOCKER PS ) you will need to stop it for a moment.
    • run command - systemctl daemon-reload
    • run command - sudo service docker restart
    • dont forget to start your storagenode.
  • Add Docker

      • Docker > Add

      • Enter the details for your docker setup remembering to use your internal IP address or 127.0.0.1
  • Edit Docker

      • You will see the edit icon next to each docker management console added.

      • Edit in the same way as editing a node.
        **Note: This is also where the delete docker agent is.
  • View Docker

      • Docker > View

      • Clicking the IP:Port link on the docker view screen will show you all containers running in this docker.
  • Delete Docker

      • Docker > [edit icon] - will show you the Delete Docker Agent button.
        You will be prompted to confirm this action.

Troubleshooting

To be continued....